Blog
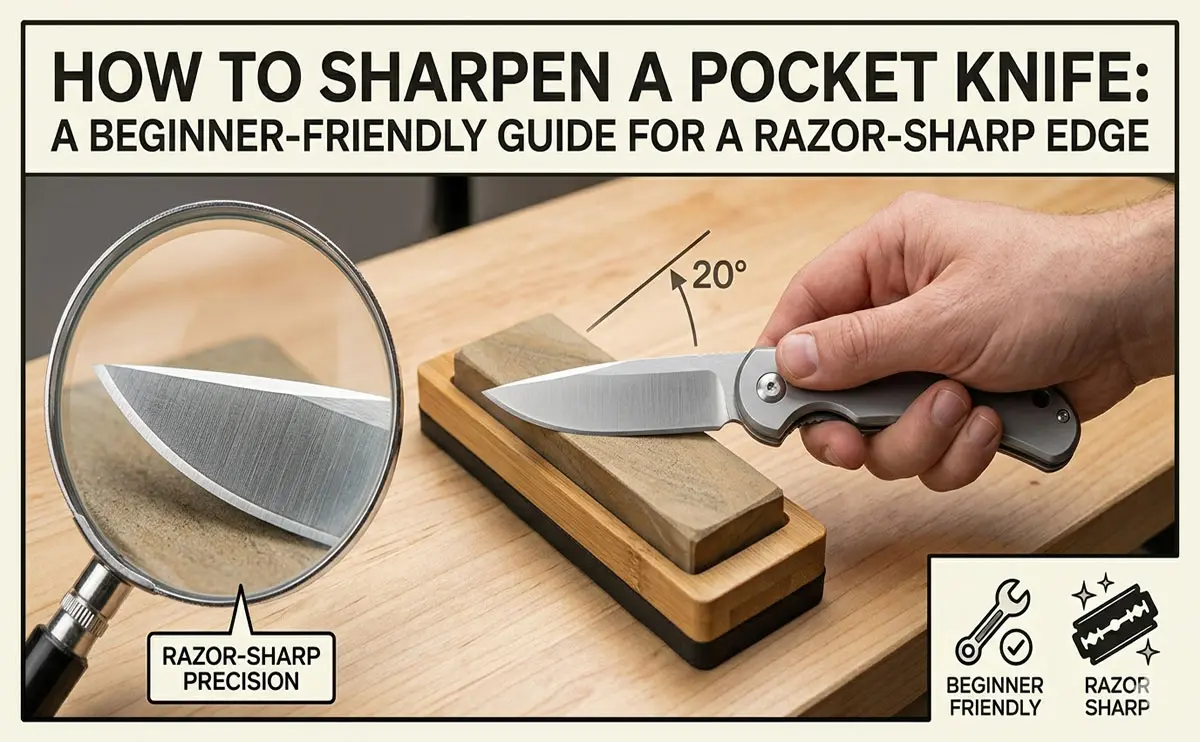
How to Sharpen a Pocket Knife: A Beginner-Friendly Guide for a Razor-Sharp Edge
Introduction: A Sharp Pocket Knife Is Safer, Cleaner, and More Useful
A pocket knife is one of the most useful everyday carry tools you can own. It opens boxes, cuts rope, prepares kindling, handles camping tasks, and helps with small repairs. But even the best pocket knife becomes frustrating — and less safe — when the edge turns dull.
A dull knife requires more pressure. More pressure means less control, and less control increases the chance of the blade slipping. Learning how to sharpen a pocket knife is not just about getting a razor-sharp edge. It is about maintaining control, extending the life of your blade, and getting better performance from your EDC knife.
The good news is that sharpening a pocket knife is not difficult once you understand three things:
The correct sharpening angle
The right sharpening tool
A consistent step-by-step technique
This guide explains how to sharpen a pocket knife safely, even if you are a beginner.
Quick Answer: How Do You Sharpen a Pocket Knife?
To sharpen a pocket knife, clean the blade, choose the correct sharpening angle, start with a coarse or medium grit stone, sharpen one side until you raise a burr, repeat on the other side, move to a finer grit, then finish by stropping or lightly honing the edge. For most EDC pocket knives, a sharpening angle of about 17–22 degrees per side works well. Heavier outdoor knives may benefit from a slightly stronger angle around 22–25 degrees per side.
What You Need to Sharpen a Pocket Knife
You do not need a large workshop to sharpen a folding knife. A few simple tools are enough.
Basic Sharpening Tools
1. Whetstone or diamond stone
A whetstone gives you the most control and is ideal for maintaining a high-quality pocket knife edge.
2. Guided sharpening system
A guided sharpener helps beginners maintain a consistent angle. This is useful if you struggle to hold the same angle by hand.
3. Pocket field sharpener
A compact field sharpener is convenient for camping, hiking, hunting, or travel.
4. Ceramic rod
Useful for touch-ups and light maintenance, especially when the knife is not fully dull.
5. Leather strop
A strop helps remove the final microscopic burr and polish the edge.
6. Clean cloth and water or oil
Use the lubricant recommended for your stone. Some stones need water, some need oil, and diamond plates often work dry or with a little water.
Best Sharpening Angle for a Pocket Knife
The sharpening angle affects how sharp and durable your knife edge will be.
| Knife Use | Recommended Angle Per Side | Best For |
|---|---|---|
| Light slicing | 15–17° | Food prep, paper, light cutting |
| Everyday carry | 17–22° | Boxes, rope, plastic, general use |
| Outdoor/heavy use | 22–25° | Wood, tough materials, harder tasks |
For most pocket knives, 20 degrees per side is a practical starting point. It gives a good balance between sharpness and durability.
A lower angle creates a sharper but more delicate edge. A higher angle creates a stronger edge that can handle rougher cutting tasks.
If your knife came with a factory edge, try to match the original bevel as closely as possible. This removes less steel and keeps the blade geometry consistent.
Choosing the Right Grit
Sharpening stones come in different grit levels. Lower grit removes more steel. Higher grit refines and polishes the edge.
| Grit Range | Purpose |
| 200–400 grit | Repairing chips or very dull blades |
| 600–1000 grit | General sharpening |
| 1000–3000 grit | Refining the edge |
| 3000–6000+ grit | Polishing and fine slicing performance |
For most pocket knives, a 600–1000 grit stone is enough to restore a working edge. If you want a cleaner, more polished edge, follow with a 3000 grit stone or a leather strop.
Avoid starting with an extremely coarse stone unless the blade is damaged or very dull. Coarse stones remove metal quickly, and unnecessary metal removal shortens the life of your knife.
Safety First: Before You Start Sharpening
Pocket knives are small, which makes them easy to control but also easy to mishandle. Before sharpening, follow these safety rules:
- Work on a stable surface with good lighting.
- Keep your fingers away from the edge path.
- Sharpen slowly instead of rushing.
- Push the blade away from your body when possible.
- Use light to moderate pressure.
- Make sure the folding knife is fully locked open if it has a locking mechanism.
- Do not sharpen a loose or damaged knife before fixing the mechanical issue.
If your knife has blade play, a weak lock, or a damaged pivot, repair those problems before sharpening.
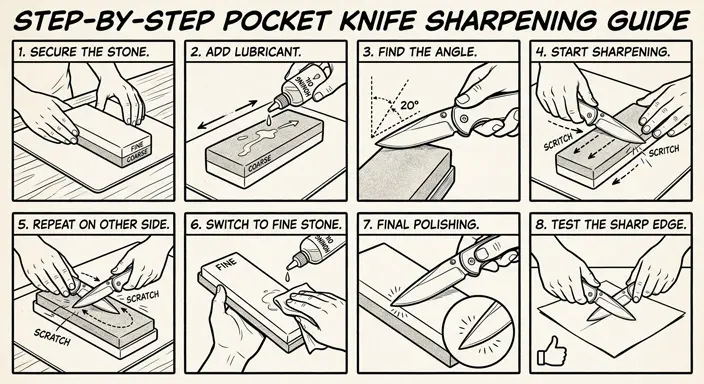
Step-by-Step: How to Sharpen a Pocket Knife with a Whetstone
Step 1: Clean the Knife
Before sharpening, wipe the blade clean. Remove dirt, tape residue, sap, food particles, or oil. A dirty blade can clog the stone and make sharpening less effective.
For folding knives, also check the pivot area. You do not need to deep-clean the knife every time you sharpen it, but the blade edge should be clean before it touches the stone.

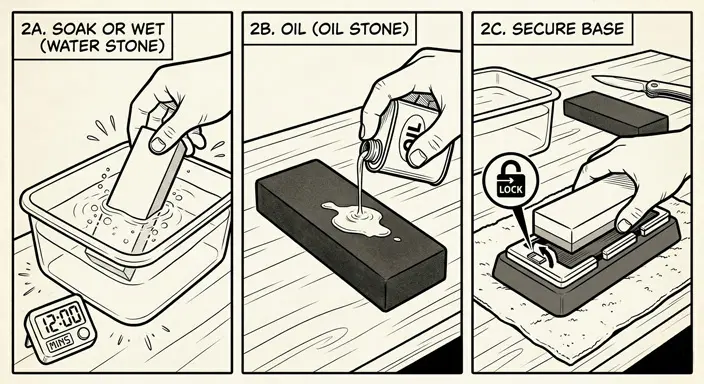
Step 2: Prepare the Stone
If you are using a water stone, soak it according to the manufacturer’s instructions. Some stones require soaking for 10–15 minutes, while splash-and-go stones only need a little water on the surface.
If you are using an oil stone, apply honing oil. If you are using a diamond plate, a small amount of water can help carry away metal particles.
Place the stone on a non-slip base or damp towel so it does not move during sharpening.
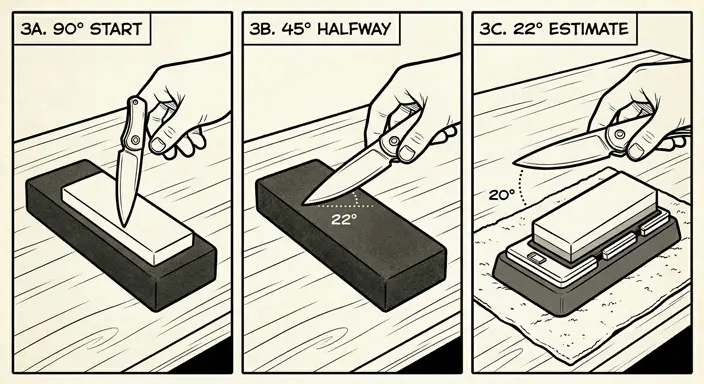
Step 3: Find the Correct Angle
Hold the knife at your chosen angle, usually around 20 degrees per side for an EDC pocket knife.
A simple way to estimate 20 degrees:
- Hold the blade at 90 degrees to the stone.
- Lower it halfway to 45 degrees.
- Lower it halfway again to about 22 degrees.
- Slightly adjust lower if you want around 20 degrees.
Consistency matters more than perfection. A steady 20-degree angle will produce a better edge than constantly changing between 15 and 25 degrees.
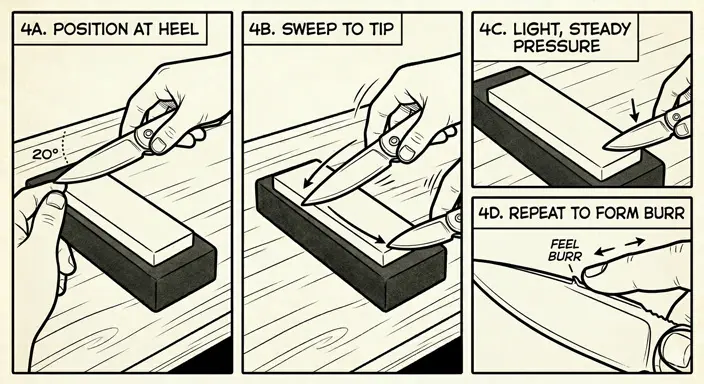
Step 4: Sharpen the First Side
Place the heel of the blade near one end of the stone. Keeping the angle steady, move the blade across the stone as if you are slicing a thin layer from the surface.
Move from heel to tip so the entire cutting edge touches the stone. Use light to moderate pressure.
Repeat this motion several times on one side. Your goal is to create a small burr along the opposite side of the edge.
A burr is a tiny fold of metal that forms when you have sharpened all the way to the edge. You can carefully feel for it by moving your finger from the spine toward the edge — never along the edge.
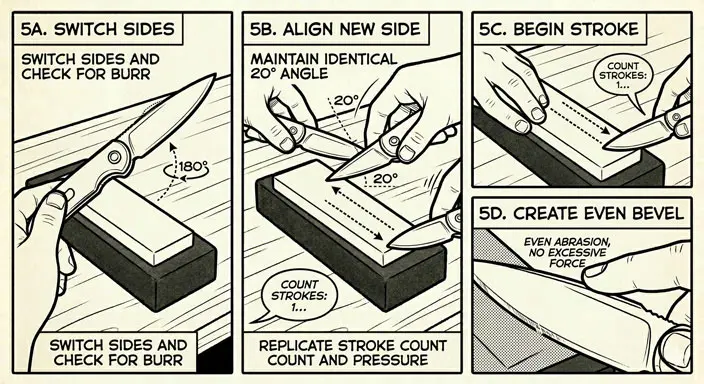
Step 5: Sharpen the Other Side
Once you feel a burr along the full length of the blade, switch sides.
Repeat the same number of strokes using the same angle and pressure. Try to keep your movement smooth and controlled.
Do not press too hard. Sharpening is controlled abrasion, not force. Excessive pressure can damage the edge or make the bevel uneven.
Step 6: Alternate Sides
After both sides have been sharpened, begin alternating strokes: one stroke on the left side, one stroke on the right side.
This helps center the edge and reduce the burr.
Use lighter pressure as you get closer to finishing. The final strokes should be controlled and gentle.
Step 7: Move to a Finer Grit
If you started with a coarse or medium stone, move to a finer grit to refine the edge.
For example:
- Start with 600 grit for a dull knife.
- Move to 1000 grit for a clean working edge.
- Finish with 3000 grit or a strop for extra refinement.
You do not need a mirror polish for most EDC knives. In fact, a slightly toothy edge from a 1000 grit stone can be excellent for cutting rope, cardboard, and packaging.
Step 8: Strop the Edge
A leather strop removes the final burr and polishes the cutting edge.
Place the blade on the strop at the same sharpening angle, then pull the knife backward, away from the cutting edge. Do not push the cutting edge into the leather, or you may cut the strop.
Use several light passes on each side.
Stropping can make a noticeable difference. It often turns a sharp knife into a very sharp knife.
Step 9: Test the Sharpness Safely
Do not test sharpness on your finger.
Use one of these safer tests:
Paper test:
Try slicing a sheet of printer paper from heel to tip. A sharp knife should cut cleanly without tearing.
Light reflection test:
Hold the edge under a light. Dull spots often reflect light. A sharp edge usually does not shine directly back at you.
Cardboard test:
Cut a piece of cardboard with light pressure. The knife should bite into the material smoothly.
If the blade catches, tears, or slips, return to a fine stone or strop and refine the edge.
How to Sharpen a Pocket Knife with a Guided Sharpener
A guided sharpening system is a great choice if you want consistent results without learning freehand sharpening.
The process is simple:
- Clamp or secure the knife according to the sharpener’s instructions.
- Set the sharpening angle, usually around 20 degrees per side.
- Start with a medium grit stone or plate.
- Sharpen one side until you raise a burr.
- Repeat on the other side.
- Progress to finer grits.
- Finish with a ceramic hone or strop.
Guided systems are especially helpful for premium pocket knives because they reduce the risk of uneven bevels.
The downside is that they are less portable than a small whetstone or field sharpener.
How to Sharpen a Pocket Knife with a Pull-Through Sharpener
Pull-through sharpeners are fast and beginner-friendly, but they are not always the best option for high-quality blades.
To use one:
- Place the sharpener on a stable surface.
- Insert the blade into the correct slot.
- Pull the knife through with light pressure.
- Repeat a few times.
- Finish with the fine slot if available.
The main advantage is convenience. The main disadvantage is that some pull-through sharpeners remove more steel than necessary and may not match your knife’s original edge angle.
For inexpensive utility knives, they can be useful. For premium EDC knives, a whetstone or guided system gives better control.
How to Sharpen a Serrated Pocket Knife
Serrated knives require a different method. Do not sharpen serrations flat on a whetstone like a plain edge.
Use a tapered ceramic or diamond sharpening rod.
- Identify the beveled side of each serration.
- Match the rod size to the serration.
- Place the rod in the groove at the original angle.
- Use light strokes inside each serration.
- Repeat each groove evenly.
- Lightly remove the burr from the flat side.
Sharpening serrations takes more patience, but it preserves the cutting pattern of the blade.
If your knife has a partially serrated edge, sharpen the plain edge with a stone and the serrated section with a rod.
Common Pocket Knife Sharpening Mistakes
1. Using Too Much Pressure
Heavy pressure does not make sharpening faster in a good way. It can damage the edge, create uneven bevels, and remove too much steel.
Use controlled, moderate pressure at the beginning and lighter pressure near the end.
2. Changing the Angle Constantly
Inconsistent angle control is one of the most common beginner mistakes. The result is a rounded edge that feels dull even after many strokes.
Focus on keeping the angle steady.
3. Skipping the Burr
If you never raise a burr, you may not have reached the actual edge. The knife may look polished but still fail to cut well.
Sharpen until you form a small burr along the full edge, then refine and remove it.
4. Starting with the Wrong Grit
A very fine stone will take too long on a dull knife. A very coarse stone may remove too much metal.
For normal sharpening, start around 600–1000 grit.
5. Forgetting to Clean the Knife After Sharpening
Sharpening leaves metal particles and abrasive residue on the blade. Wipe the knife clean, dry it completely, and apply a light coat of oil if needed.
How Often Should You Sharpen a Pocket Knife?
It depends on how often you use it.
| Use Level | Sharpening Frequency |
| Light EDC use | Every 2–4 months |
| Regular work use | Every few weeks |
| Outdoor or heavy use | As needed |
| Collector/display knife | Rarely, mostly maintenance |
Do not sharpen more than necessary. Touching up the edge with a strop or ceramic rod can extend the time between full sharpening sessions.
A good rule: sharpen when the knife no longer cuts cleanly with light pressure.
How to Keep Your Pocket Knife Sharp Longer
Sharpening is important, but daily habits matter too.
- Do not cut on glass, stone, or metal surfaces.
- Avoid using your knife as a screwdriver or pry bar.
- Clean adhesive residue after cutting tape or boxes.
- Dry the blade after exposure to moisture.
- Store the knife in a dry place.
- Use a light coat of oil on high-carbon or tool steel blades.
- Touch up the edge before it becomes completely dull.
A knife that is maintained regularly is easier to sharpen and lasts longer.
Whetstone vs Guided Sharpener vs Field Sharpener
| Method | Best For | Pros | Cons |
| Whetstone | Best overall control | Precise, versatile, affordable | Requires practice |
| Guided sharpener | Consistent angle | Beginner-friendly, accurate | Less portable |
| Field sharpener | Outdoor use | Compact, convenient | Less refined |
| Pull-through sharpener | Quick touch-ups | Very easy | Can remove too much steel |
If you are serious about maintaining pocket knives, start with either a whetstone or a guided sharpening system. If you often carry a knife outdoors, add a compact field sharpener to your kit.
Final Thoughts: Sharpen Slowly, Stay Consistent, and Protect the Edge
Learning how to sharpen a pocket knife is one of the most valuable skills for any EDC user. You do not need expensive equipment or expert-level technique to get a sharp, reliable edge. You need patience, the right angle, and consistent strokes.
For most pocket knives, a 20-degree angle per side, a 600–1000 grit stone, and a leather strop will produce an excellent working edge.
Sharpen slowly. Check your progress often. Remove the burr. Keep the edge clean. With practice, your pocket knife will cut better, last longer, and feel more reliable every time you carry it.
FAQ: How to Sharpen a Pocket Knife
What is the best angle to sharpen a pocket knife?
For most pocket knives, 17–22 degrees per side is a good range. A 20-degree angle per side is a practical choice for everyday carry because it balances sharpness and durability.
Can I sharpen a pocket knife with a kitchen knife sharpener?
Yes, but it depends on the sharpener. Pull-through kitchen sharpeners are convenient, but they may remove more steel than necessary and may not match your pocket knife’s original edge angle. A whetstone or guided sharpener is usually better for quality EDC knives.
How do I know when my pocket knife is sharp enough?
Use a paper test or cardboard test. A sharp pocket knife should slice paper cleanly and cut cardboard with light pressure. Avoid testing sharpness on your skin.
Should I use water or oil on a sharpening stone?
Use the lubricant recommended by the stone manufacturer. Water stones use water, oil stones use honing oil, and diamond stones can often be used dry or with a little water.
Can I sharpen a damaged pocket knife blade?
Small chips can often be repaired with a coarse stone or diamond plate. Large chips, broken tips, or severely damaged edges may require professional sharpening.
Is a leather strop necessary?
A strop is not required, but it improves the final edge by removing the remaining burr and polishing the blade. It is one of the easiest ways to make a sharp knife feel sharper.
How often should I sharpen my pocket knife?
Sharpen it when it no longer cuts cleanly with light pressure. For light EDC use, every few months may be enough. For frequent work or outdoor use, you may need to sharpen more often.
What is the easiest way for a beginner to sharpen a pocket knife?
A guided sharpening system is the easiest way to maintain a consistent angle. A whetstone gives more control, but it requires more practice.